Description & levels
Main features
- Creation of mobile enclosures and tracking of geographical positions
- Creation of Points of Interest
- Creation of routes
- Support for NanoCell and NaoVisu
- Display of mobile cooling on a map
- Display mobile cooling routes on a map
- Consultation of tour history and tour reports
Levels
The level of your MySirius Calibration module is indicated at the top of your Metrology dashboard.
Below are the functionalities according to the module chosen: (Indication subject to change)
Level 1 - With ‘last known position’, POI log, preferences and Naovisu management functions
Level 2 - With Level 1 + functionalities:
- Tour / Dispatch management
- Route tracking
- NaoScan parcel tracking
User manual
Monitoring tab
If the Mobility module is activated, the Monitoring menu undergoes some changes.
In the action line, you’ll find a  . A button to filter units and display only mobile units.
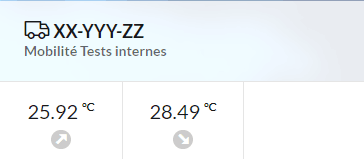
In thumbnail display mode, a  indicates that the unit is a mobile one.
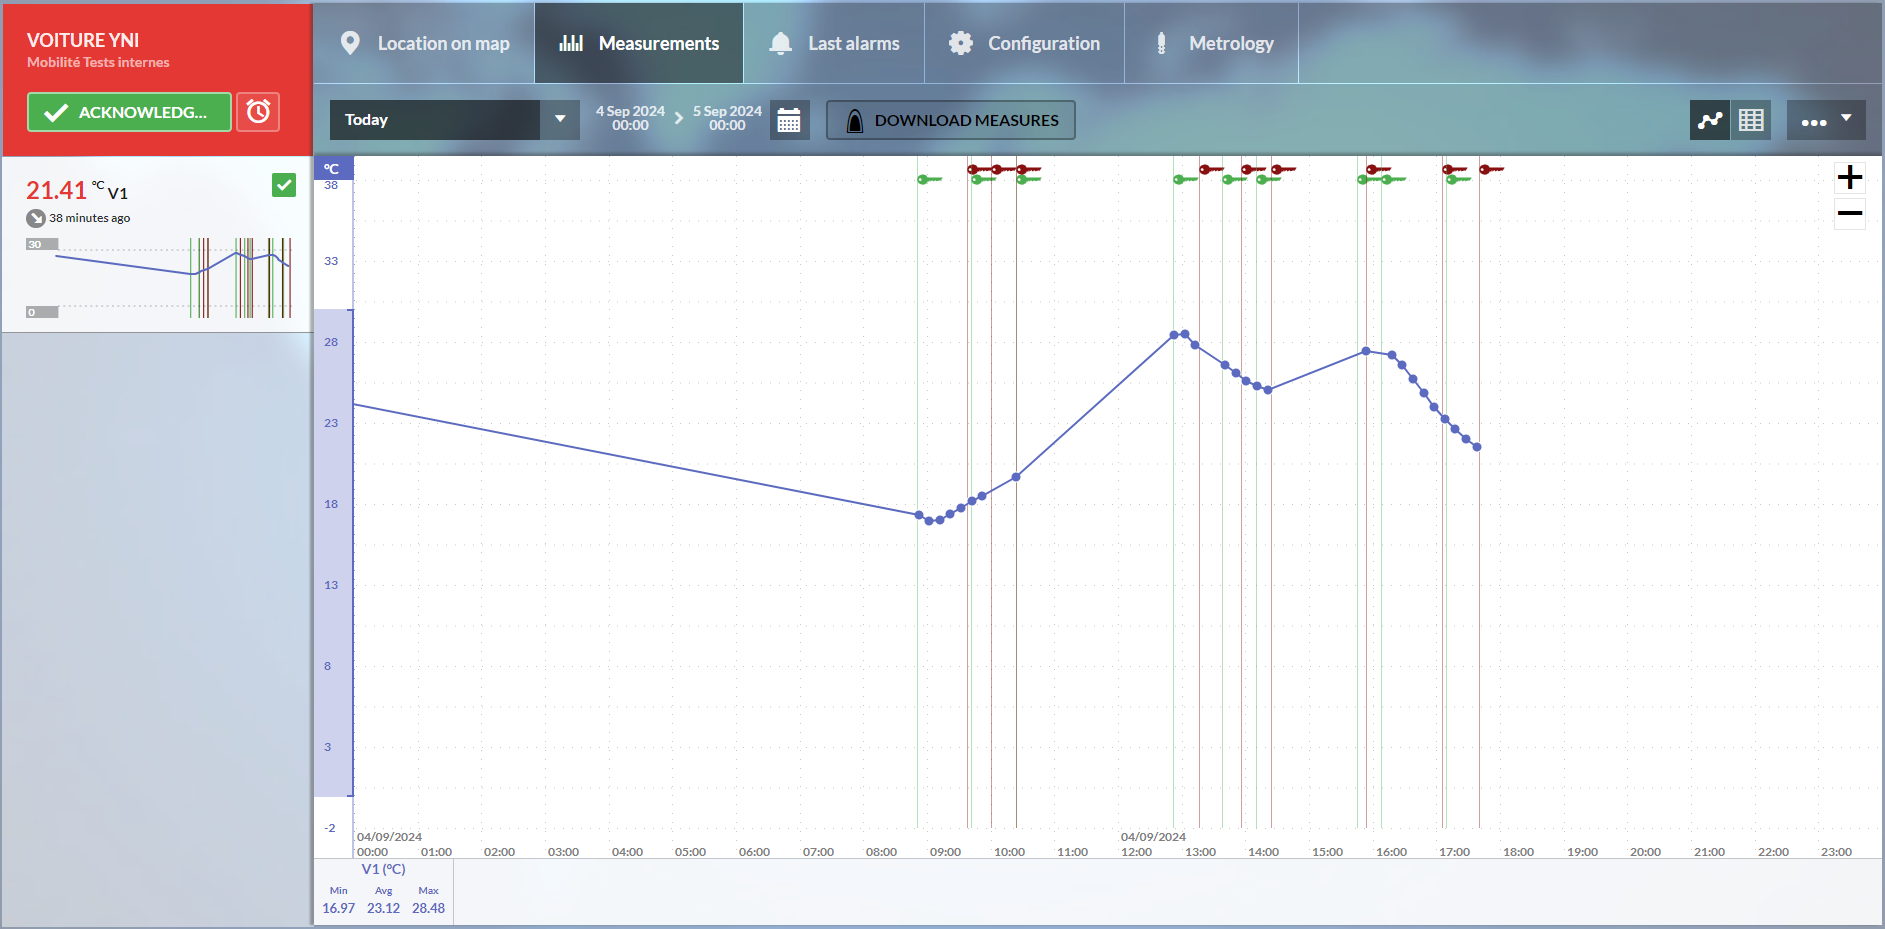
In the graphic display for a mobile unit, the icon represents the status of the mobility gateway (Nanocell, Naocell hybrid):
 Green key: The gateway is powered on (the vehicle is switched on).
 Red key: The gateway is powered off (the vehicle is switched off).
Dashboard
The Mobility module home screen groups all the functions into 4 sections.
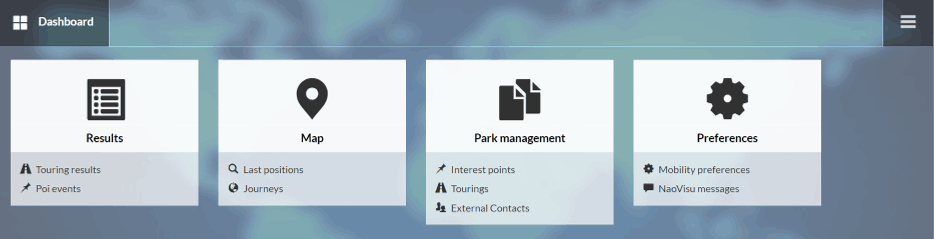
Quick access to the menu is available by clicking on

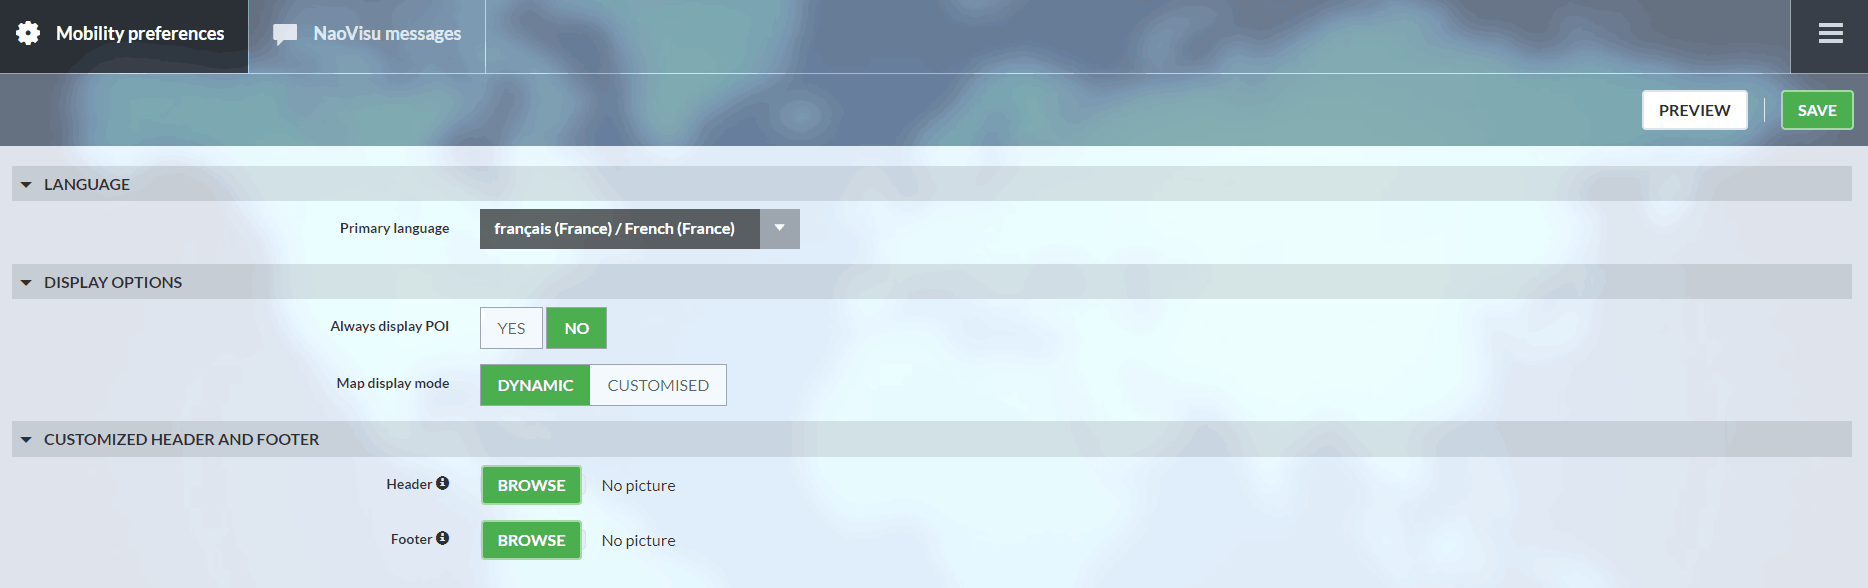
Preferences

Mobility preferences
Customise your reports and set your language preferences. Use the ‘PREVIEW’ button before saving your settings.
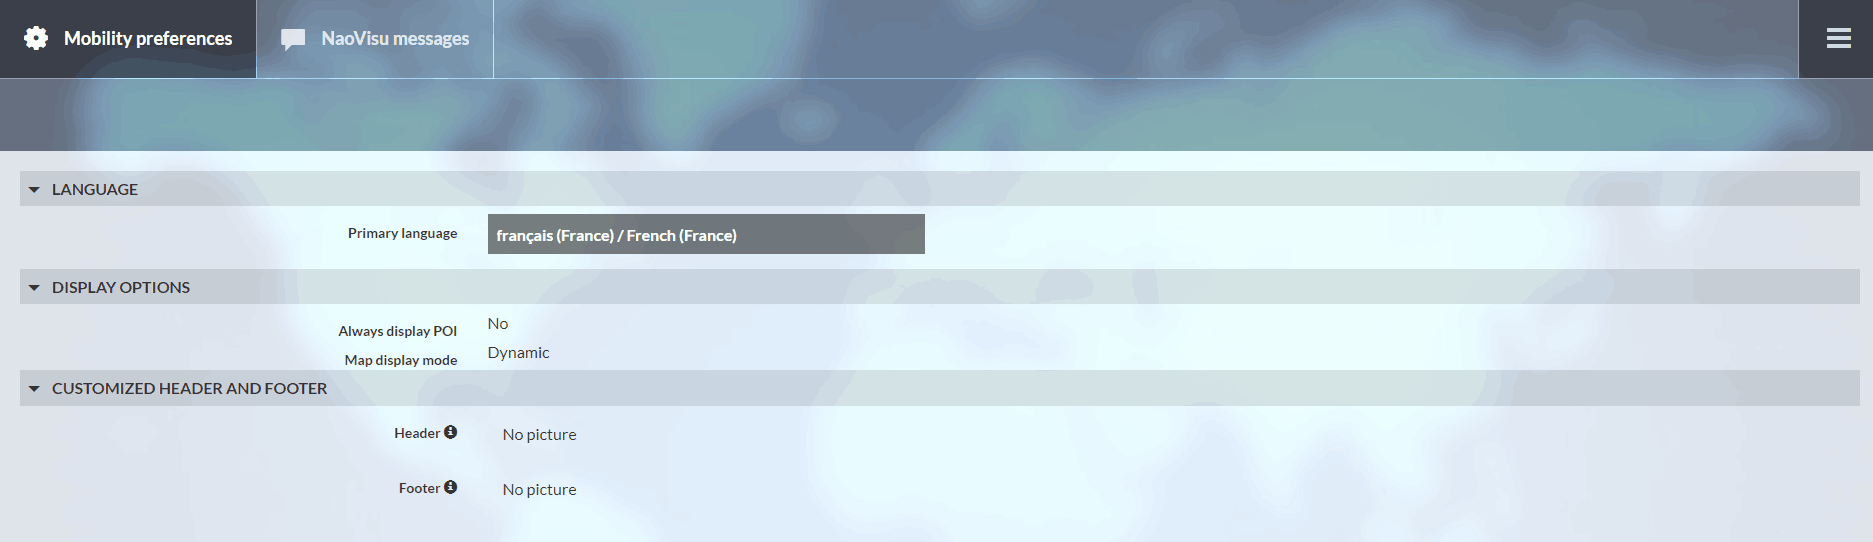
Map display mode :
- Dynamic mode, the map opens on your device’s IP address
- Customised mode, the map opens at a point defined by the administrator
Message NaoVisu
View messages defined in the NaoVisu display park messaging system (optional product).

Results
This tab is divided into two main sections:
Delivery tour results: In this section, all completed tours are displayed in table form, in descending chronological order. It shows the name of the tour, the vehicle or group of vehicles involved, the start and end dates, the tour report, and the status of the tour (completed or not). By clicking on the  icon, you can download the report generated for this tour.
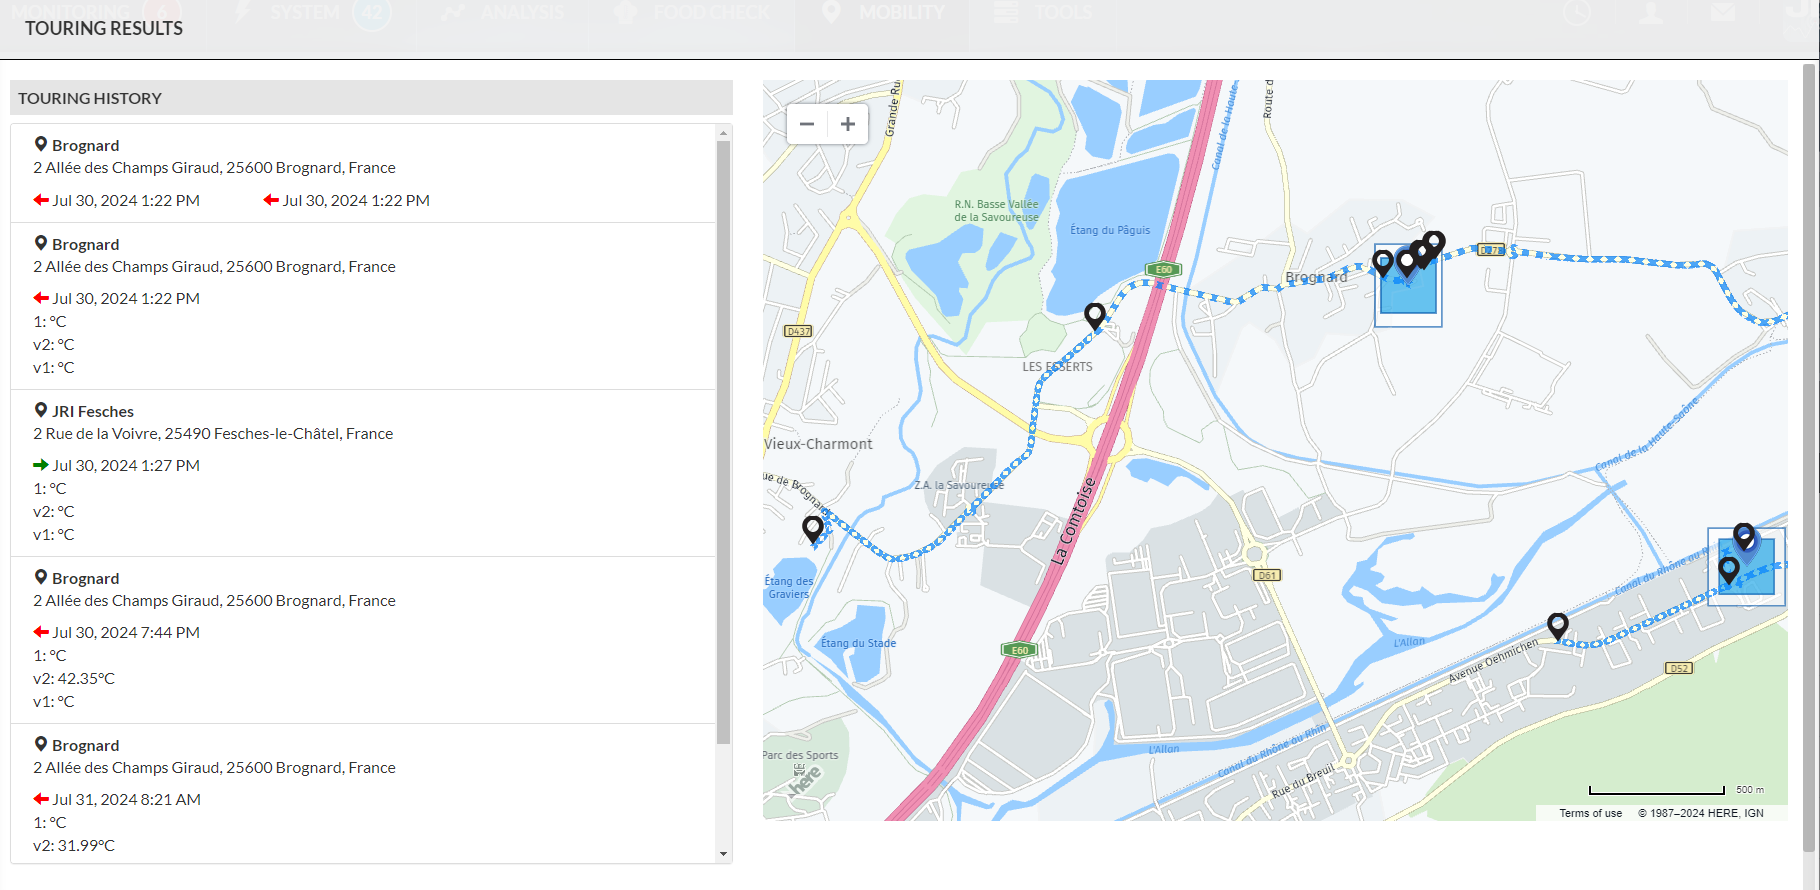
- By clicking on a tour, you can view the tour’s information: name, day of operation, fleet, start and stop conditions, as well as the tour’s results history.

- In the tour history, you’ll find the vehicle or group of vehicles used, its start and end date, the report linked to this tour, its duration and the events encountered during this tour. By clicking on the past tour, you can display on a map the vehicle itinerary followed during that tour. The route includes all recorded GPS coordinates, including P.O.I. points.
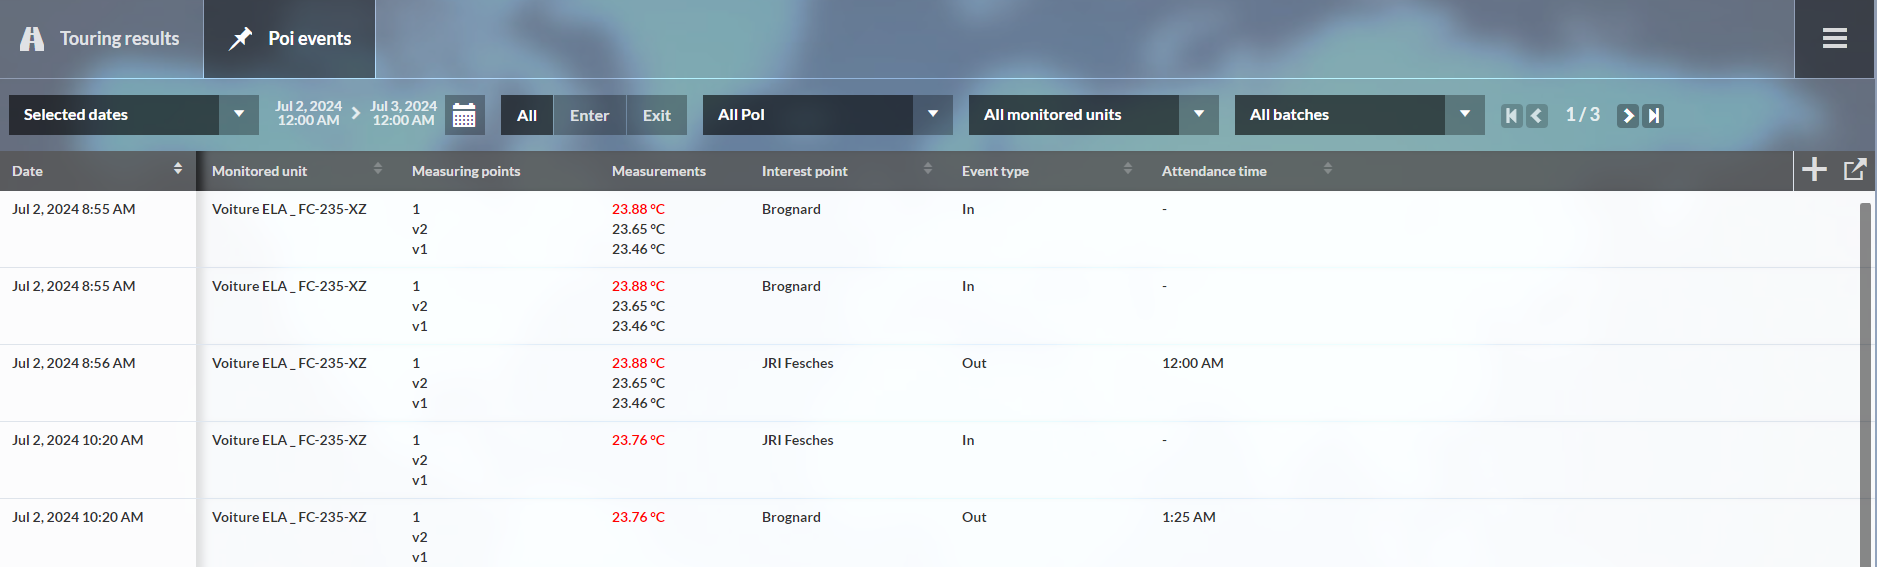
Points of Interest (P.O.I.) log: In this section, you have access to all P.O.I.’s in table form, with the date of the last passage, the mobile enclosure concerned, the value measured during this passage and the time spent within this P.O.I. By selecting a P.O.I., you access an activity log which displays all events on this P.O.I.: entries, exits, enclosures concerned, date and measurements.
- Various filters are available, and they are cumulative:
- Date: You can select a time interval (today’s date by default).
- Event Type: In / Out / All.
- Selection of a particular P.O.I. (default: all).
- Selection of a mobile enclosure (by default all).
- P.O.I. events are sorted by date, from most recent to oldest
- Different columns
- Date
- Name of unit concerned
- Type of event
- Name of P.O.I concerned
- Time spent on P.O.I.
- Value of measurement points on the unit
- Unit status (in alarm, pre-alarm, no alarm)
Data can be exported in PDF or CSV format. Data export takes filters into account. The P.O.I. log is also added to the list of schedulable reports (Report feature).
Map

Transport operation indicators allow you to display the geographical location of your fleet of mobile units.
Last positions
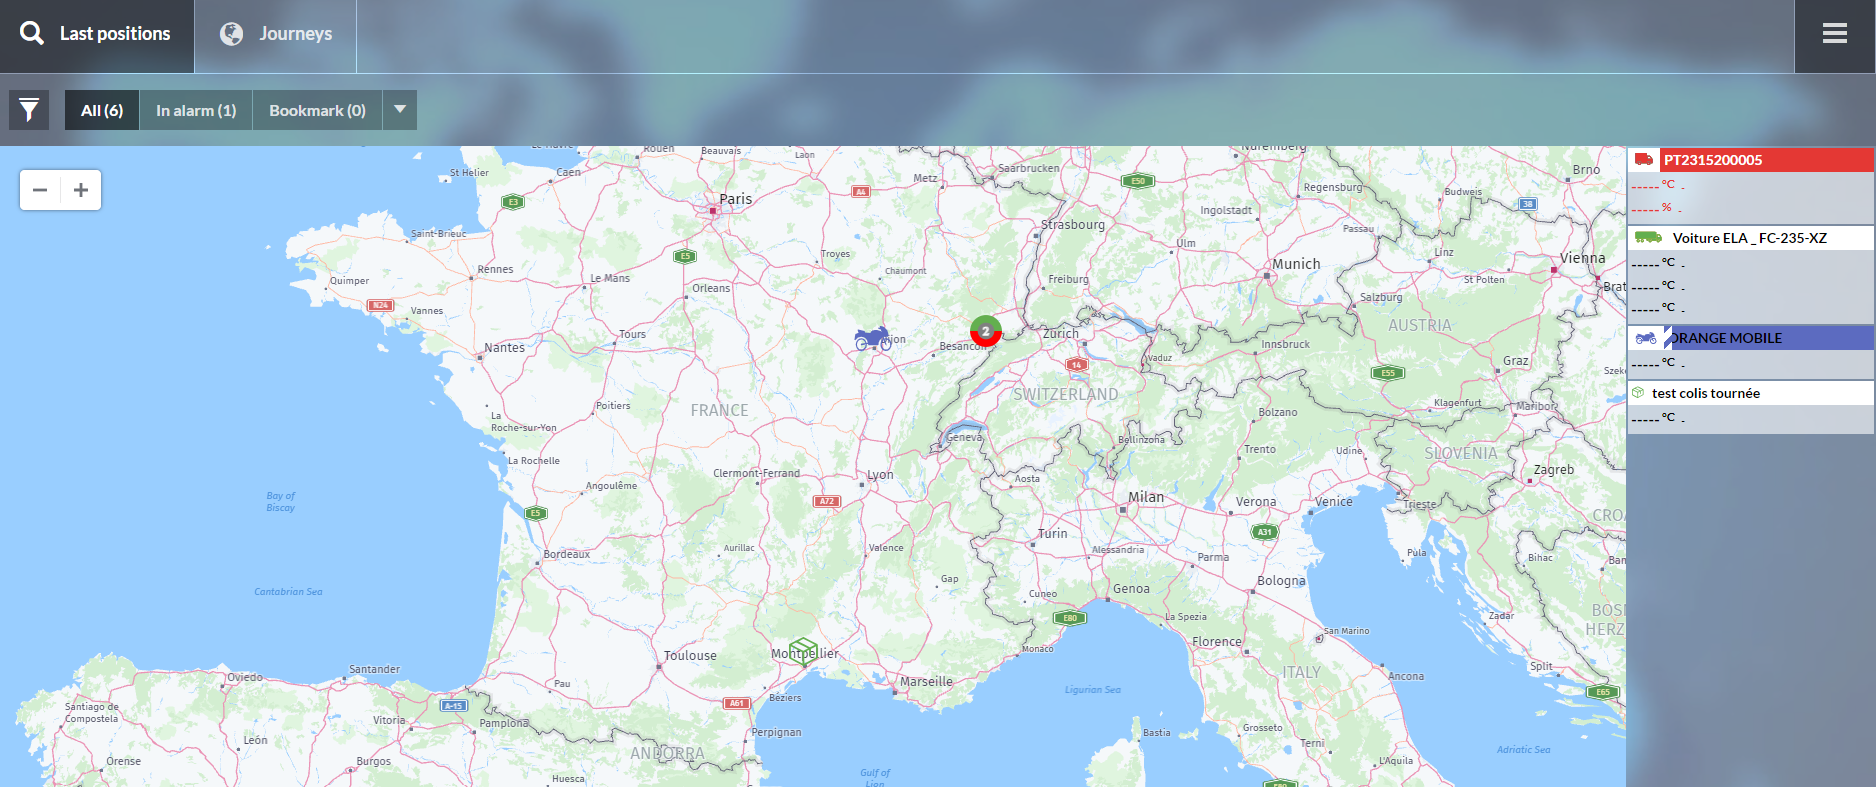
You can see a map showing all the mobile speakers with the MySirius colour code:
- Red: unit in alarm status
- Orange: unit in non-critical alarm status
- White: unit in normal status
- Black: unit in inhibited alarm status
- Blue: unit in metrology mode
- Yellow: unit in maintenance mode
On the right of the map, a list of visible units with their last measurement and associated color code. Clicking on a vehicle or units, displays a thumbnail with measurement history and available actions (acknowledge and snooze). By clicking on the ![]() icon, you can view the vehicle’s route history.
icon, you can view the vehicle’s route history.
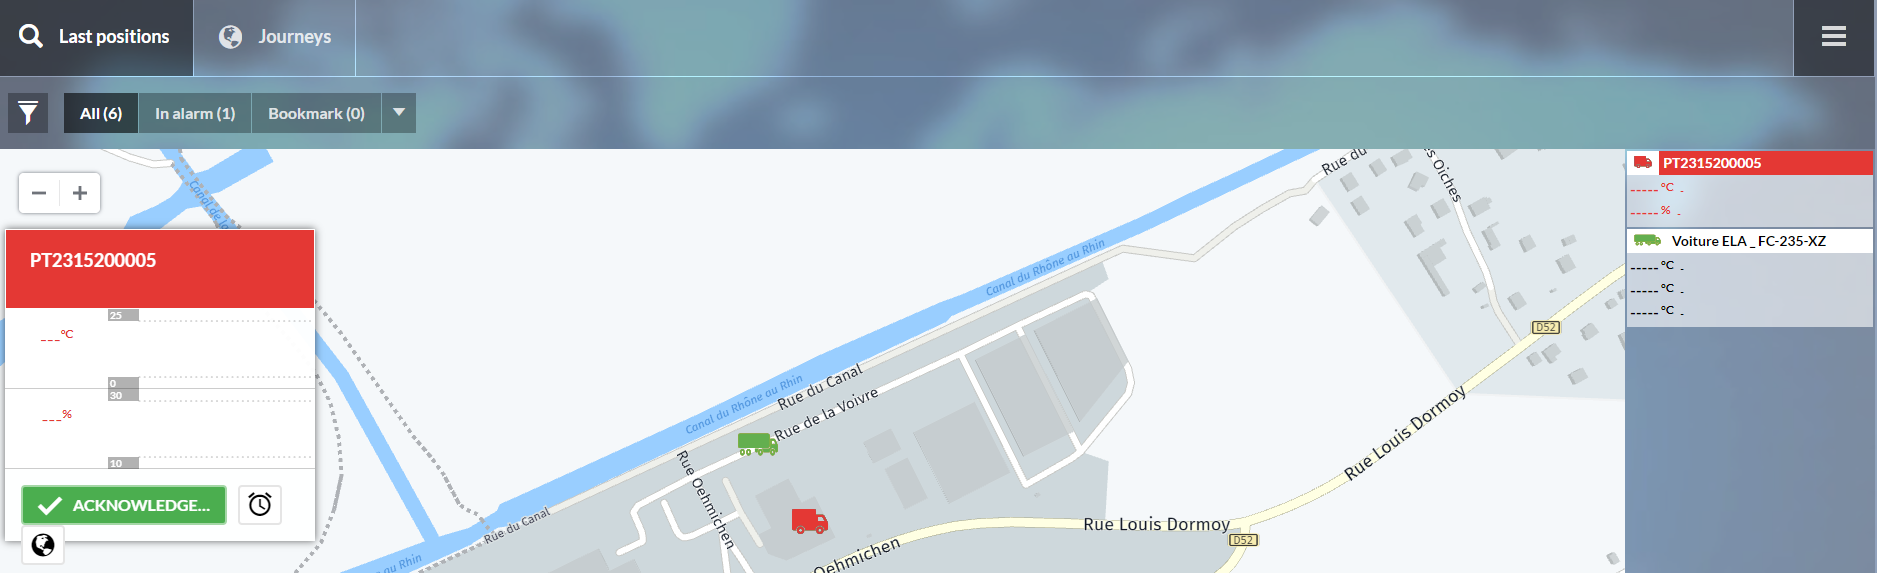
If the “Always display P.O.I.” option is enabled in the preferences, mobile speakers will appear as clusters with different colors representing their respective states.

Journeys
In the “Journeys” menu, select a mobile unit from those available. Once the unit has been selected, a map of the vehicle’s journeys over the selected period is displayed (by default, “today”). You can also choose a predefined period (yesterday, current week, etc.) or a customized period via a calendar.
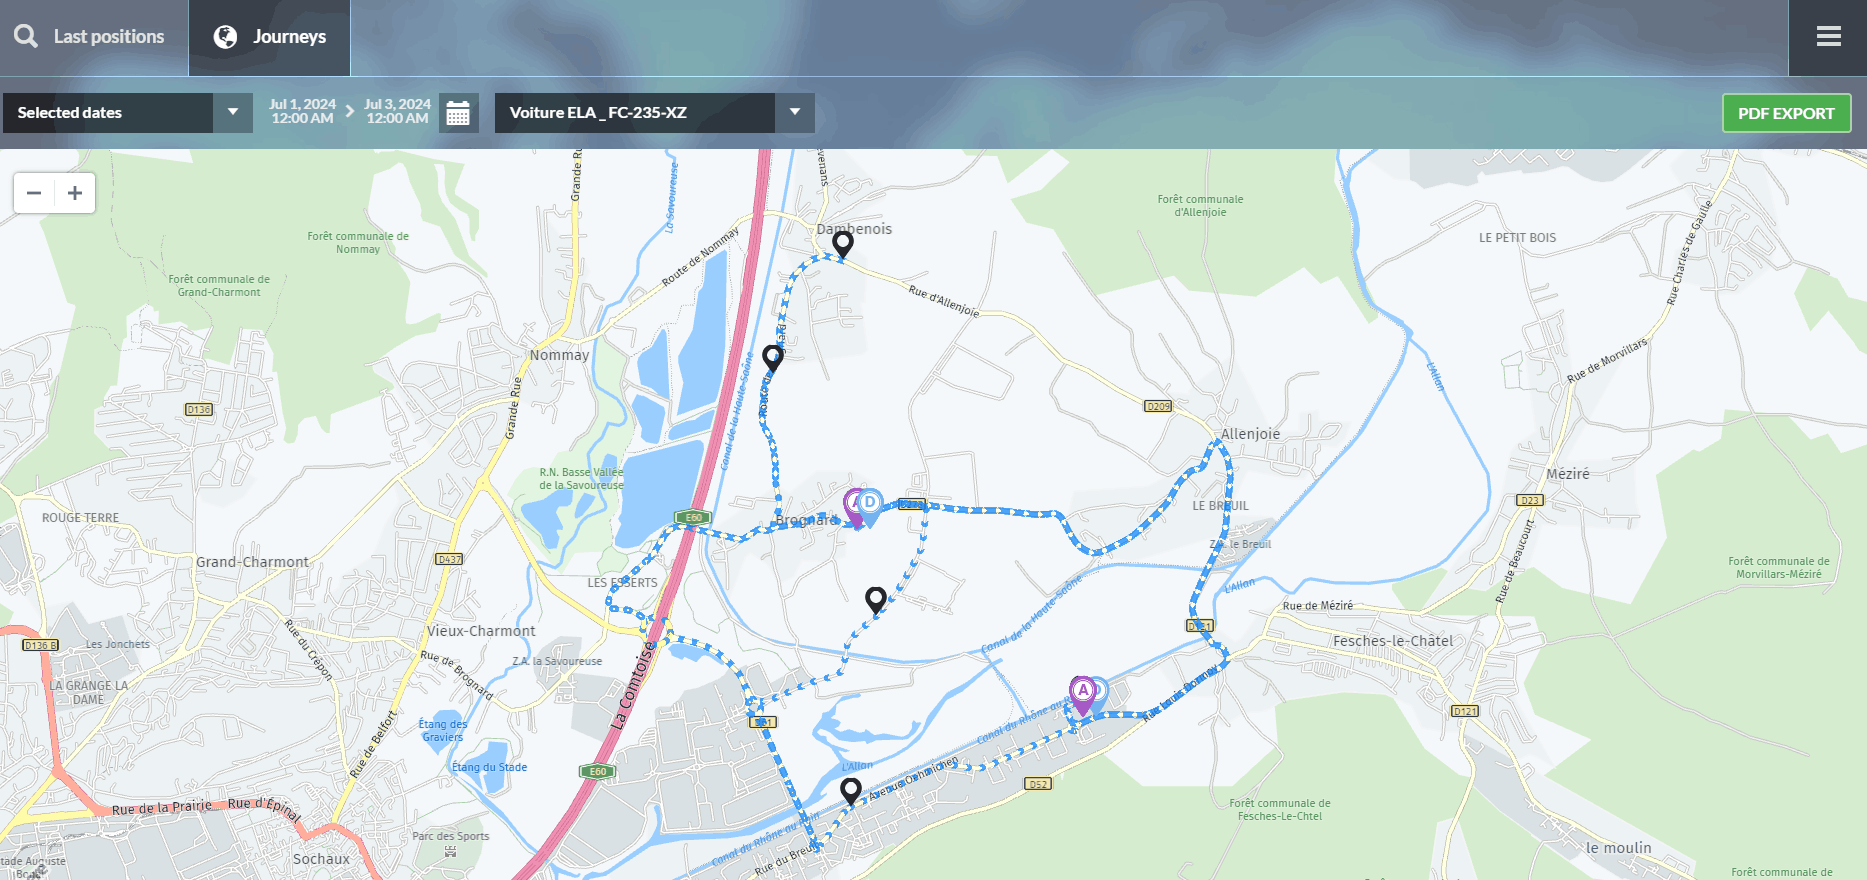
On the map, you’ll find:
 icon, indicating the starting point of the journey
 icon for the journey’s arrival point
 icon indicating a Point of Interest
 icon representing locations where the gateway has transmitted data to MySirius
- Clicking on a point displays the measurements associated with that coordinate
- Messages transmitted via NaoVisu
If the “Always display P.O.I.” option is activated in the preferences, the mobile units will appear as green clusters indicating the number of P.O.I.s included, with the colors corresponding to the different states of the units.

Park management
This “ Park management ” section allows you to consult Points of Interest (P.O.I), routes and external contacts (see Administration manual).
Points of Interest (P.O.I)

Delivery tour

External contacts

Admnistration Manual
Mobility preferences
Customise your reports and set your language preferences. Use the ‘PREVIEW’ button before saving your settings.
Map Display Mode:
- Dynamic mode: The map opens based on your device’s IP address.
- Custom mode: The map opens at a point defined by you by clicking on the icon

NaoVisu Message
Delete, add or customise the NaoVisu display fleet message (optional product).
!

Declaration of a Mobility communication device
Mobility Gateways
Gateway is the term used in JRI MySirius to describe communication boxes. These devices transfer measurements sent by the Nano SPY, Nova SPY, or LoRa® SPY (connected probes) to JRI MySirius.
For mobility, the Mobility Gateway is called NANOCELL, and it communicates with the Nova SPY & Nano SPY. The Nanocell must be installed first to enable the detection of the Nova SPY & Nano SPY.
- Also, provide a 5/12 volt power supply for the Nanocell Gateway.
- Open JRI MySirius and select the “Administration” tab.
- Click on the Gateways tile.
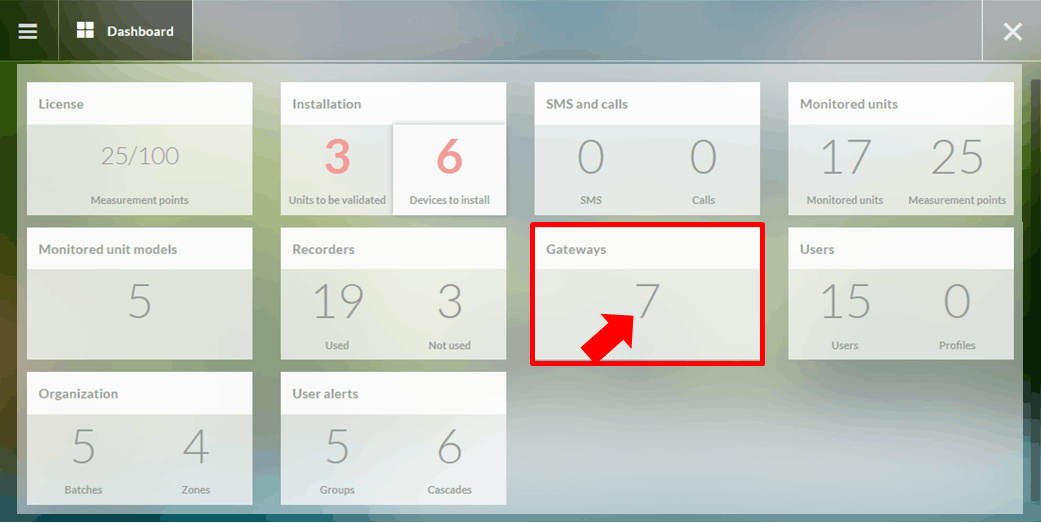
The list of installed Nanocells is displayed. For first-time installations, this list will be empty.
- Click on.
- Select NanoCell for “Device type.”
- Fill in the fields in the dialog box that opens. When finished, click on “Save.”
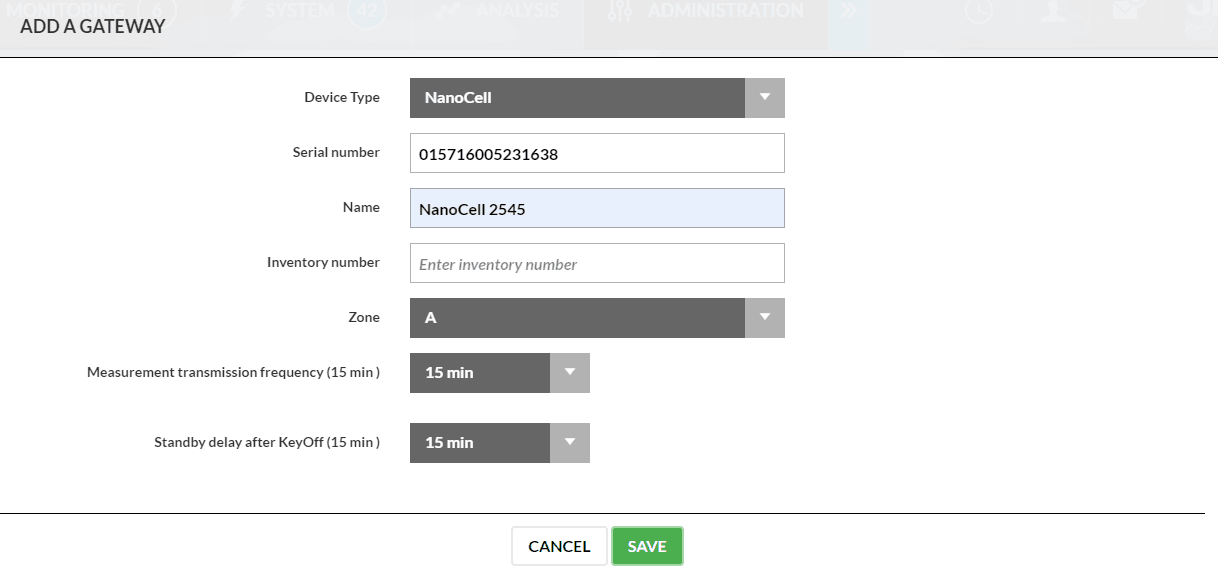
If everything goes well, the declared Nanocell should appear in the list. Once the parameters have been entered, the Nanocell is ready for use.
You can declare a large number of Nanocells at once by dragging and dropping a .csv file:
- Click on
 .
. - Upload your file.
If everything goes well, the declared Nanocell should appear in the list. Once the parameters are set, the Nanocell is ready for use.
Probes & Recorders
To declare a Nova SPY or Nano SPY, simply switch them on. They will then be detected by JRI MySirius and linked to the NanoCell, which will have transmitted their identification frame. You can verify that the Nova SPYs or Nano SPYs have been correctly declared in the “Administration” pane of JRI MySirius, using the “Installation” tab:
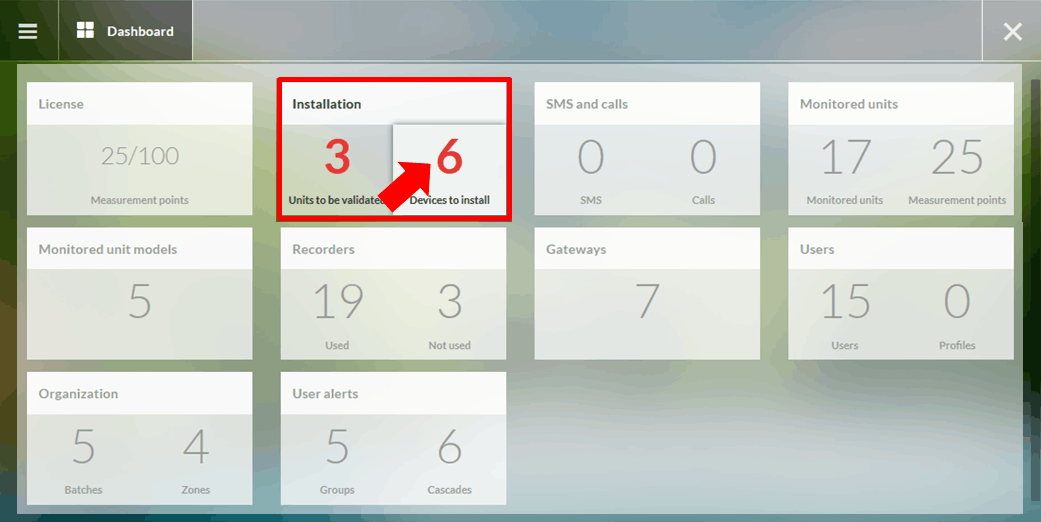
As long as devices are pending, they cannot be used to monitor a mobile enclosure. To finalize the declaration and make them usable for monitoring, click on the number of pending devices.
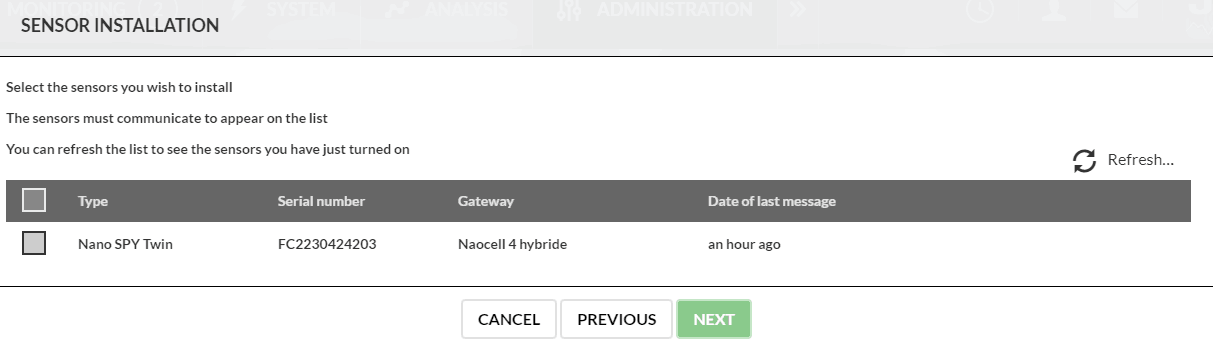
Select the devices for which you wish to complete the installation, then click “Next.”
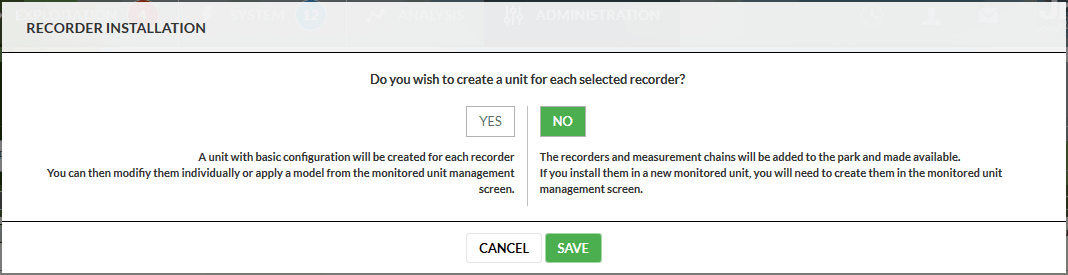
You can then choose whether or not to create an enclosure:
- If you choose “NO,” the recorder will be added to the list of available devices and will be proposed during speaker creation (see speaker creation).
- If you choose “YES,” JRI MySirius will automatically create the speakers. They will then need to be configured (see speaker configuration).
Declaration of a Mobile unit
Once the probes have been declared, it is necessary to declare the mobile units. Mobile units will be associated with the measurement points automatically created when loggers are declared, allowing variations in the monitored parameter to be visualized.
To create a unit, click on the “Units” indicator on the dashboard of the “Administration” page.
Then click on 
JRI MySirius offers two options:
- Create a unit from a template.
- Create a unit from a blank unit.
Clicking on either option opens the “Add speaker” window.
Configuration Section
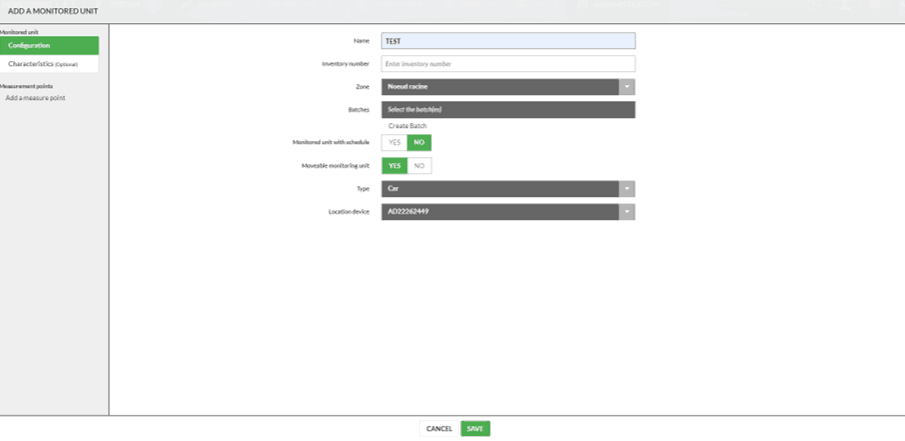
- Mobile unit: To define the speaker as a mobile speaker, enabling it to appear in the MOBILITY tile and be displayed as a mobile speaker in the OPERATION tile, select “YES” for the “MOBILE UNIT” parameter.
- Type: Choose the type of mobile unit from the following options: Refrigerated truck, Car, Motorcycle, Parcel, Semi-trailer.
- Locating Device: Select the Nanocell or NaoCell hybrid gateway used to locate the mobile unit.
Create a Point of Interest (POI)
To create a P.O.I., click on the “Points of Interest (P.O.I)” indicator in the “Fleet management” panel on the “Mobility” page.

JRI MySirius offers two options:
- Create a P.O.I. manually.
- Import from a CSV list in the following format: name, address, latitude, longitude, length, width, horizontal margin, vertical margin.
To add a P.O.I. manually, click on 
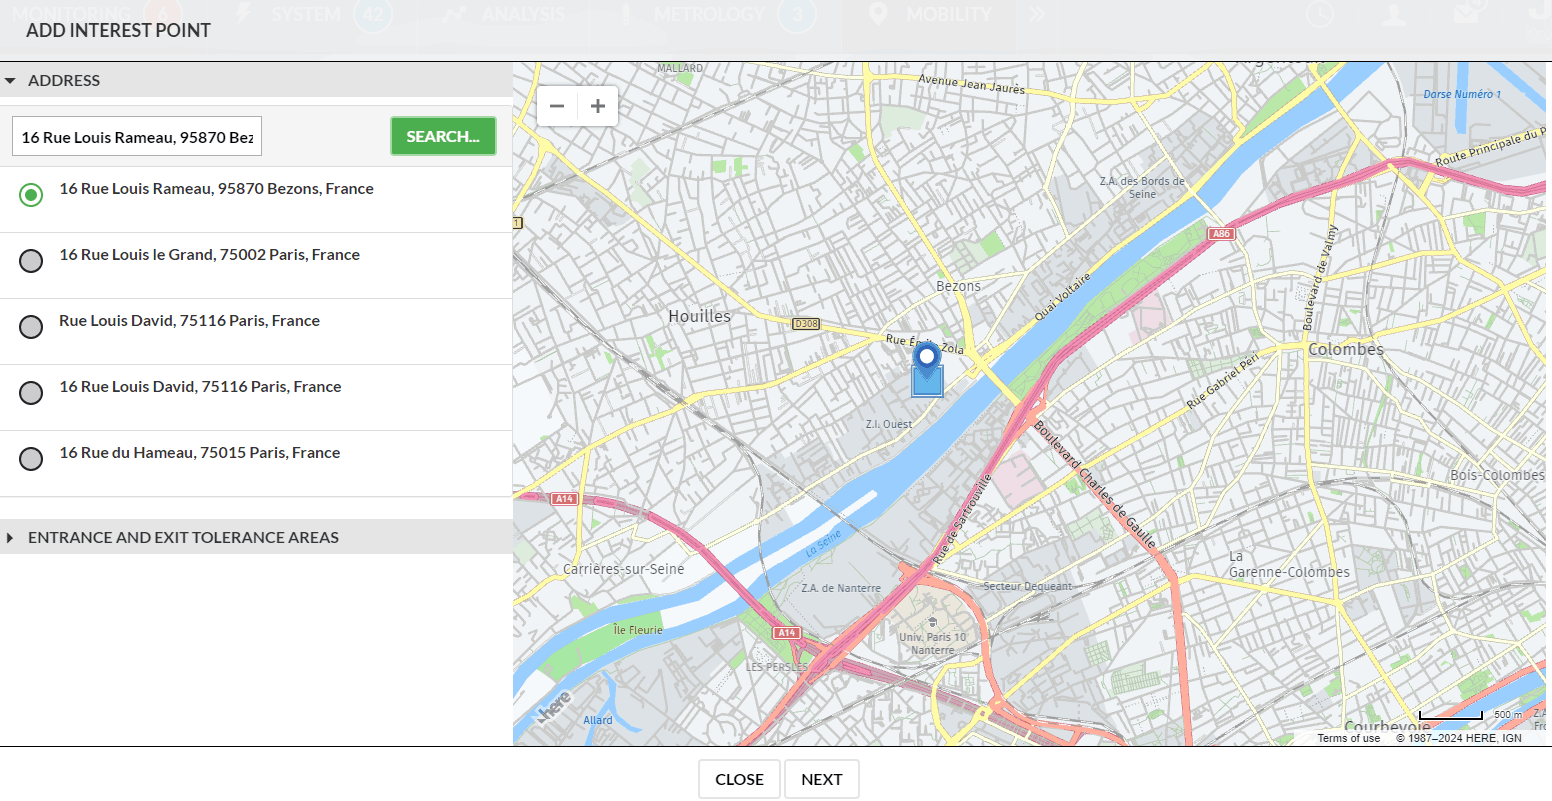
ADDRESS
Enter the full postal address of the Point of Interest (P.O.I.) and click “Search”.
One or more addresses will be proposed; select the desired address.
TOLERANCE RANGES
Enter the dimensions of your P.O.I.:
- Length: This field allows you to adjust the length of the P.O.I. entry and exit zone.
- Width: Adjust the width of the entry and exit zone of the P.O.I.
- Vertical Margin: This field creates a tolerance margin for the length of the P.O.I. entry and exit zone.
- Horizontal Margin: This field creates a tolerance margin for the width of the P.O.I. entry and exit zone.
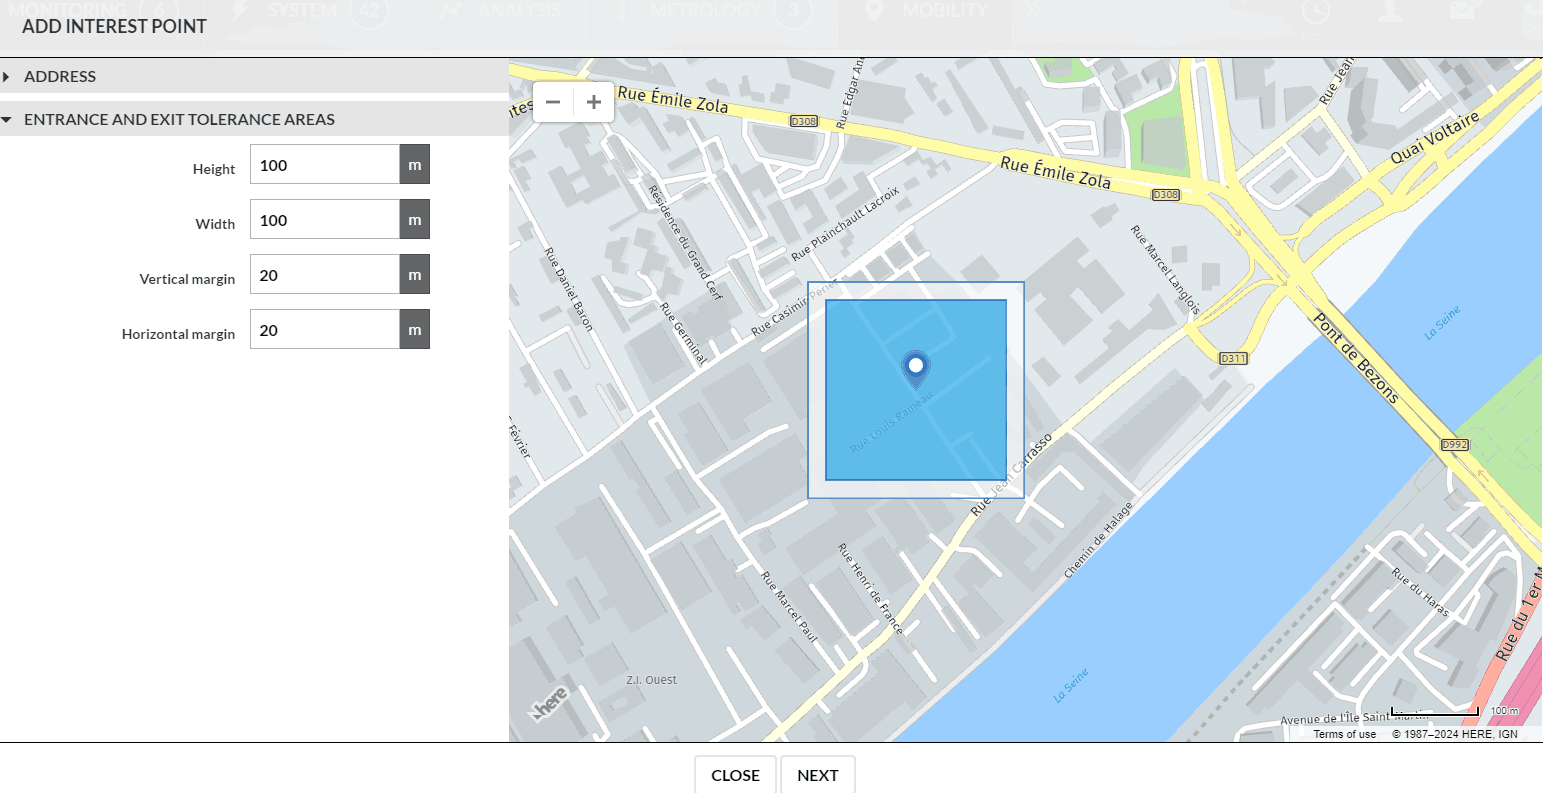
Then click Next.
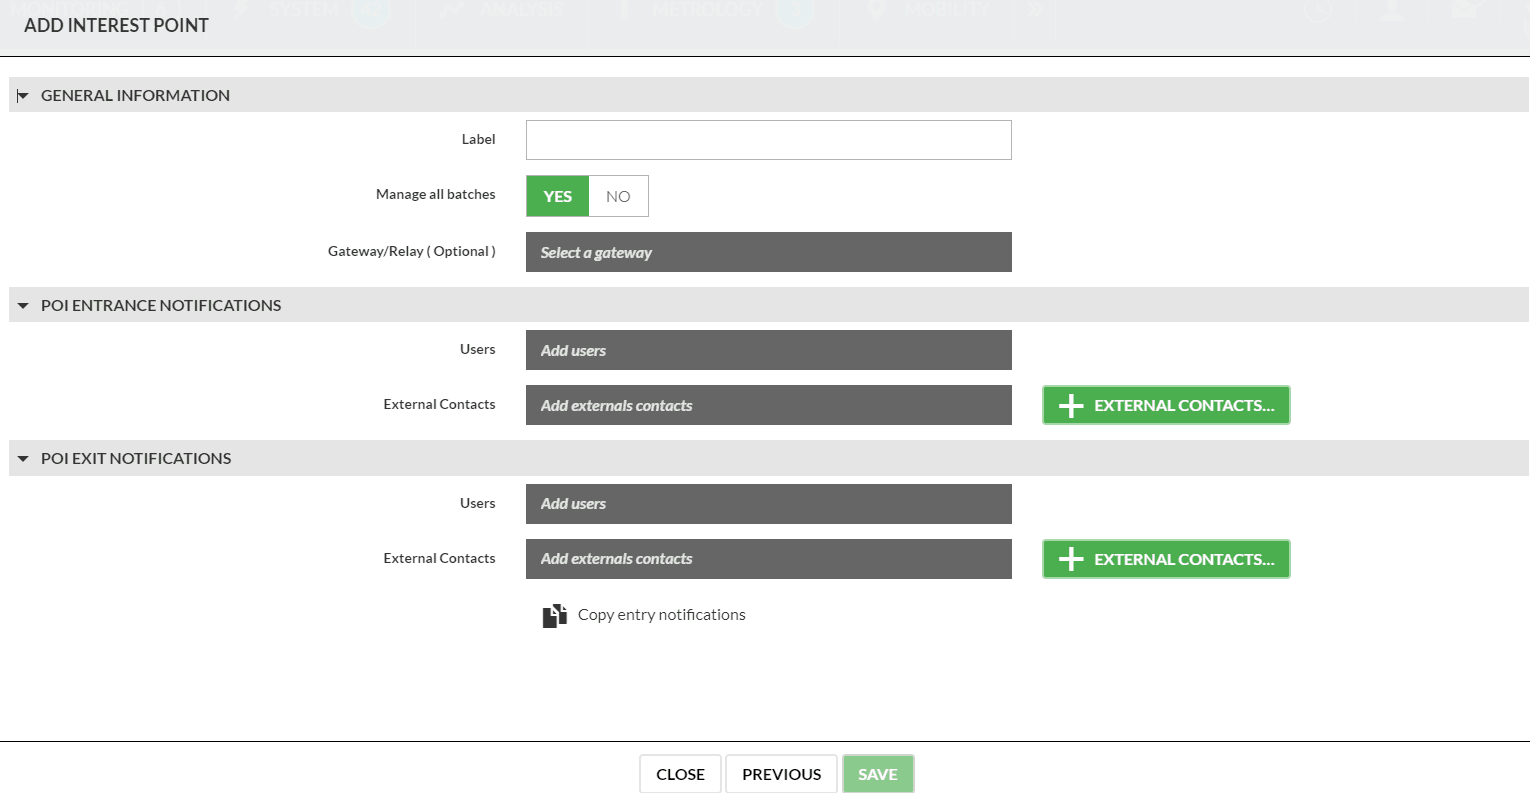
GENERAL INFORMATION
- Label
- Manage all batches: Select YES or NO.
If YES, select the Gateway from the drop-down list (Optional).
If NO, select batch(es) and Gateway from the drop-down list (Optional).
P.O.I. INPUT NOTIFICATIONS
- Users: Select one or more contacts from the list to receive notifications.
- External contacts: Select one or more external contacts from the list to receive notifications.
- Click on the
 button to add external contacts that is not in the list of choices.
P.O.I. OUTPUT NOTIFICATIONS
- Users: Select one or more contacts from the list to receive notifications.
- External contacts: Select one or more external contacts from the list to receive notifications.
- Click on the button to add external contacts that is not in the list of choices.
Then click Save.
Tour creation
To create a tour, click on the “Tour” indicator in the “Fleet management” panel on the “Mobility” page.
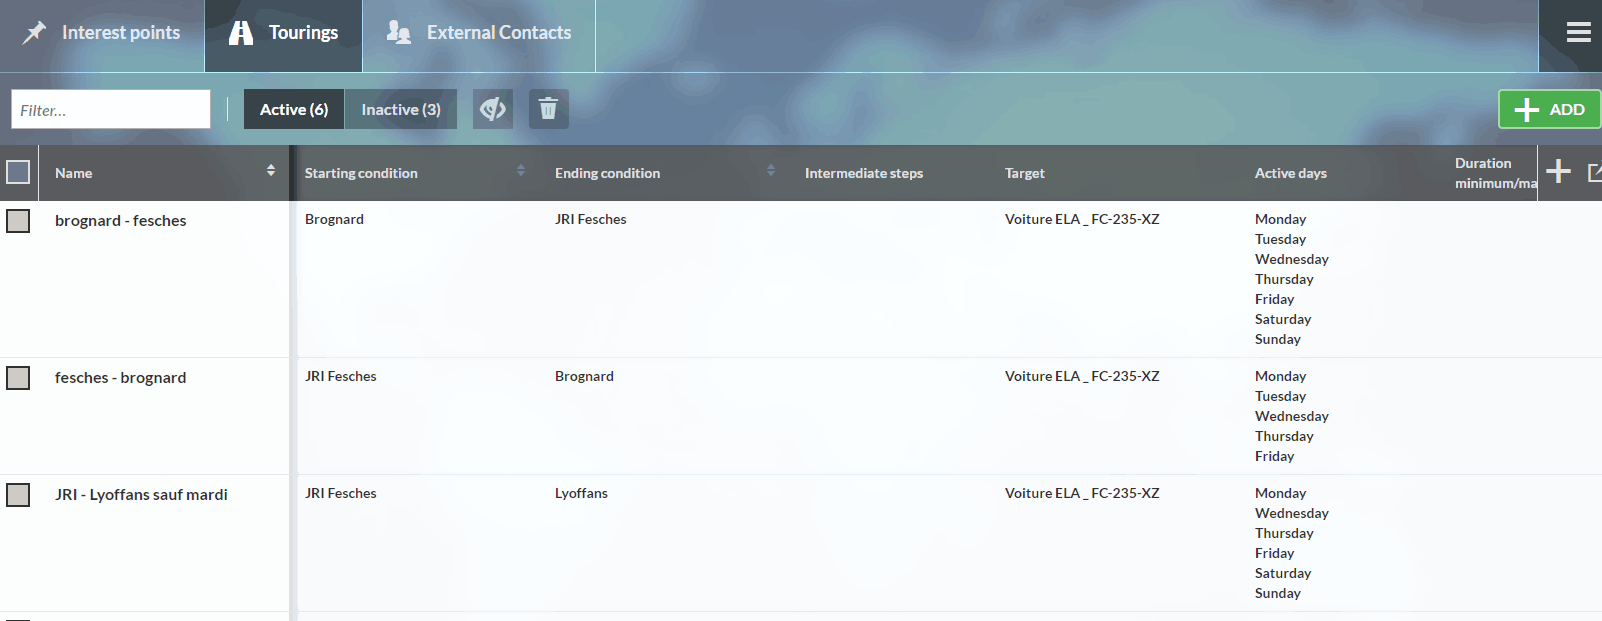
Click on
GENERAL INFORMATION
- Title: Tour identification.
- ** Target:** Define whether the tour is made by a mobile unit or by a batch of mobile units.
- Unit: Select the mobile unit or a batch of mobile units.
- Active days: Tick the days on which the tour is carried out.
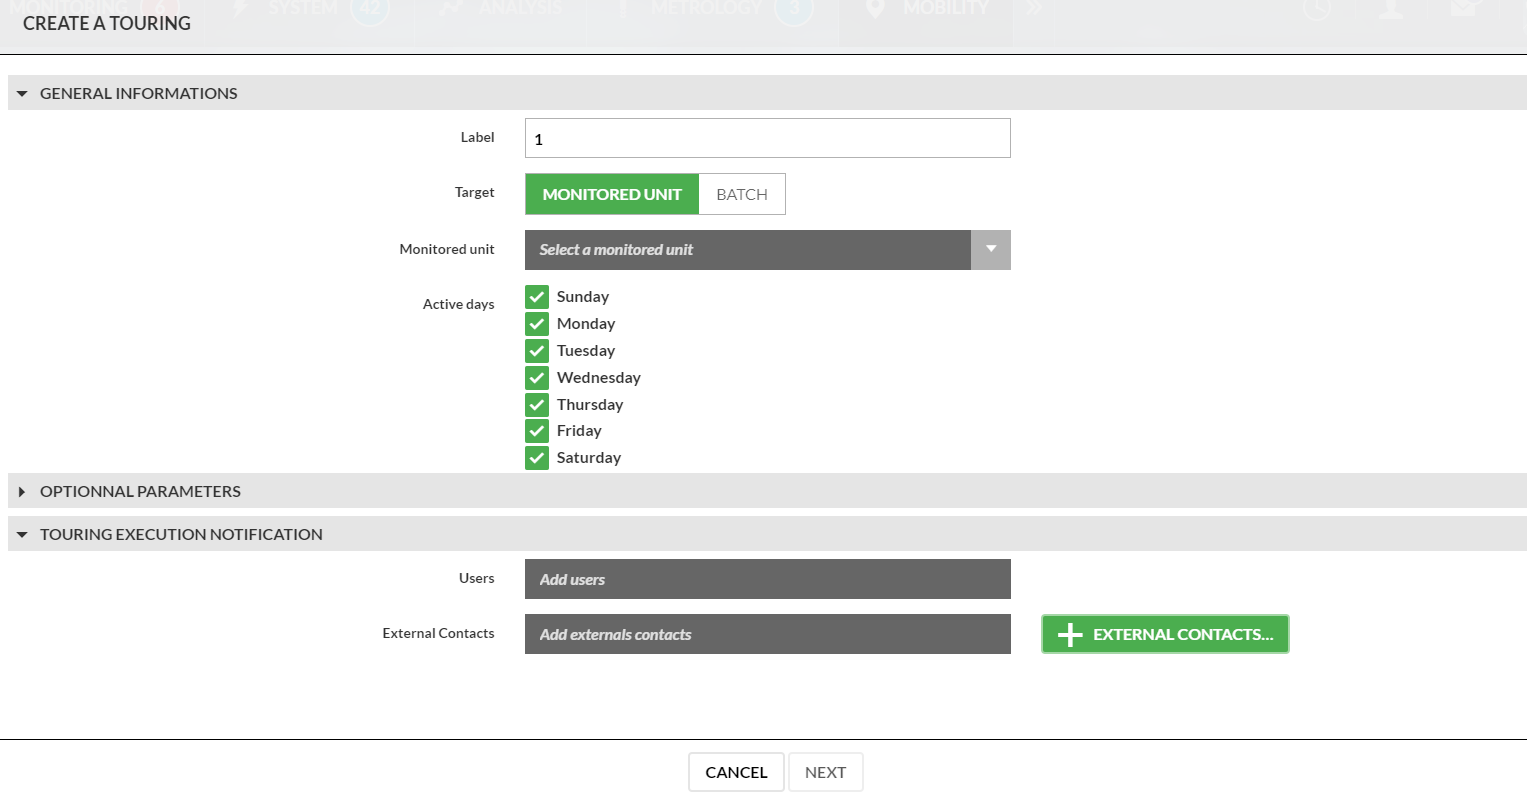
OPTIONAL PARAMETERS
- Start time: Non-mandatory field. Allows you to add the additional condition of departure time (+/- 1 hour) for tour identification.
- Minimum duration: Non-mandatory field. Allows you to add the additional condition of minimum tour duration for tour identification.
- Maximum duration: Non-mandatory field. Allows you to add the additional condition of the maximum tour duration for its identification.
TOUR COMPLETION NOTIFICATIONS
- Users: Select one or more contacts from the list to receive tour completion notifications.
- External contacts: Select one or more contacts from the list to receive notifications.
- Use the + button to add an external contact not included in the list.
Click on Next.
TOUR CONDITION
- Start condition: Select detection mode, either by P.O.I. or by Message (presence of NaoVisu display).
If P.O.I. is selected, choose the starting Point of Interest (P.O.I.) from the drop-down list.
If Message is selected, choose the starting message from the drop-down list.
- Arrival condition: Select detection mode, either by P.O.I. or by Message.
If P.O.I. is selected, choose the arrival Point of Interest (P.O.I.) from the drop-down list.
If Message is selected, choose the arrival message from the drop-down list.
MANDATORY STEP
- Mandatory step: Non-mandatory field. Select the P.O.I.(s) representing mandatory stopover(s) to refine/distinguish the tour.
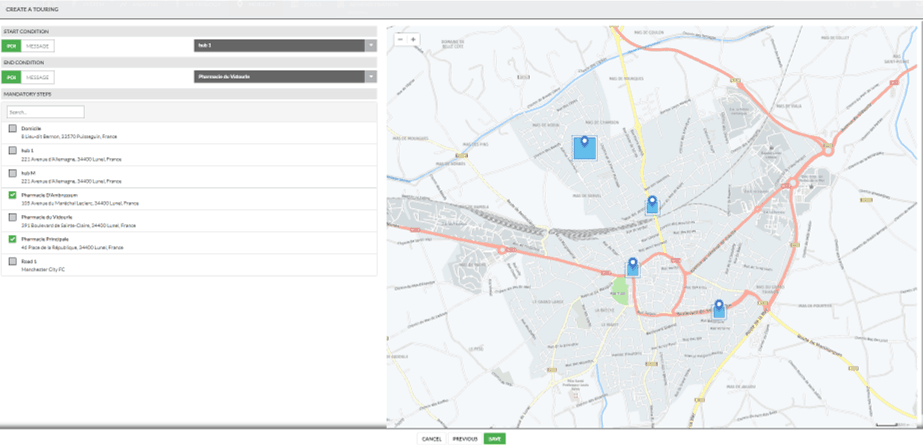
Click on Save.
Adding External Contacts
To add an external contact, click on the “External contacts” indicator in the “Fleet management” panel on the “Mobility” page.
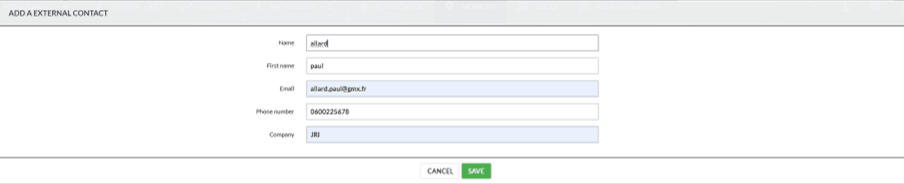
View the list of external contacts eligible for notifications, along with their details: company, surname, first name, email address, and telephone number.
To add a new contact, click on
Fill in the required fields.
Round results
In this section, you’ll find all the completed tours, displayed in descending chronological order.
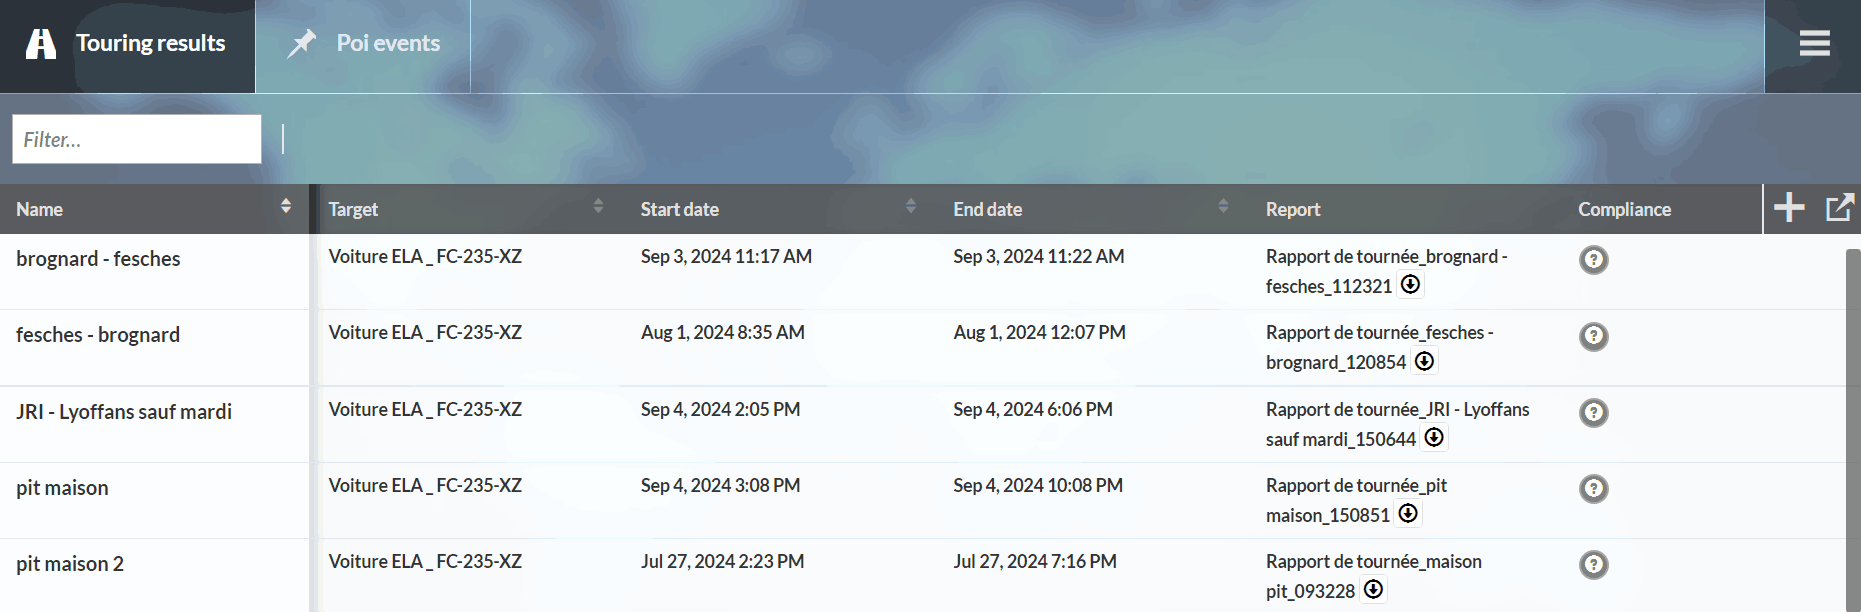
By clicking on a tour, you can view the tour’s details: name, day of operation, fleet, start and stop conditions, as well as the tour’s result history.

By clicking on the button, you can manually add a tour result:
- Select the event to be added (start, intermediate, or end condition) by clicking on the
 button.

In this new window, define the event with:
- The type of POI detection: On Entry / On Exit / NaoVisu Message
- Date and time
- Point of Interest or message (if POI detection type is NaoVisu message)
- Label (optional)

By clicking on the  button, a new window opens to delete a tour result.

Select the tour result to be deleted, then click the “DELETE” button.
Points of Interest (P.O.I.) Log
For information on this section, see the Mobility User Manual.